Soldering is an extremely useful skill to have when working with electronics, it allows you to create strong and reliable connections between components while also letting you remove and resolder components if needed. In this guide, I will be explaining how I learned to solder quickly but also safely.
Safety First
Before you even start soldering you should know some of the general risks.
- Soldering irons will get extremely hot, after all, they must melt a metal alloy to work. This means you should always be careful and focused when handling a soldering iron. I learned this the hard way after I got distracted and accidentally grabbed the hot end of the iron instead of the handle... Not fun.
- Leaded solder is toxic, you should always wash your hands after soldering and avoid touching your face or eating while soldering. If you are using lead-free solder you should still wash your hands after soldering but it is less of a concern.
- Fumes from soldering can be toxic, you should always solder in a well-ventilated area or use a fume extractor.
Tools
To solder you will need a few tools:
- Soldering Iron: This is the tool that heats up and melts the solder. I recommend getting a soldering iron with adjustable temperature settings, this will allow you to adjust the temperature based on the components you are soldering.
- Solder: This is the metal alloy that you will melt to create the connection between components. I recommend using lead-free solder as it is less toxic and overall safer for you.
- Soldering Stand: This is a stand that holds the soldering iron when you are not using it. This will prevent you from accidentally burning yourself or your work surface.
- A Sponge: This is used to clean the tip of the soldering iron. You should clean the tip of the iron before and after soldering to ensure a good connection. Do not use a wet sponge as this can damage the tip of the iron, instead use a damp sponge and wipe the tip quickly.
- Helping Hands: These are a set of alligator clips that hold your work in place while you solder. This will make it much easier to solder components onto a PCB.
- Safety Glasses: These are used to protect your eyes from any solder that jumps up as well as the fumes.
Soldering
Now that you have all the tools you need, it's time to start soldering. Our entire goal here is to connect a pad (the metal ring) with a component lead (the metal leg) using solder.
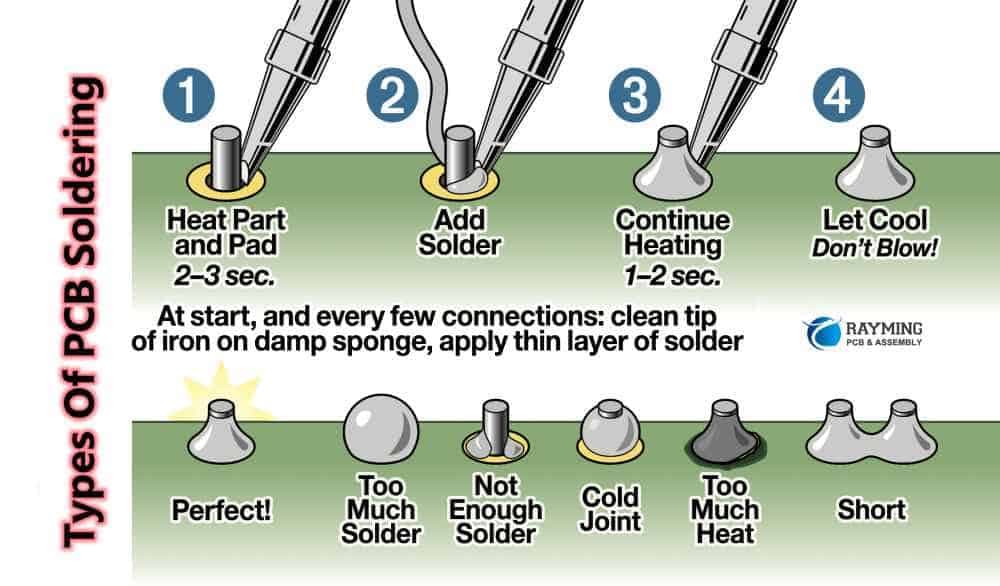
To do this, first press the iron against the pad, yes, start by heating up the pad, this should happen nearly instantly. Then, touch the solder to the pad and let it melt, the solder should flow onto the pad and create a nice shiny connection. Finally, remove the solder and the iron, the solder should cool and harden quickly. This entire process when done correctly should take less than 3 seconds. If it takes longer than that you are either using too little heat or too much solder. You can then cut off the lead of the part if needed.
A great example of a good solder joint is shown below as well as common issues that may arise:
Common Mistakes
- Cold Joint: This is when the solder does not flow onto the pad and instead forms a blob on the component lead. This is usually caused by not heating the pad enough before applying the solder which doesn't allow them to fuse together properly. This will cause issues where the connection may occasionally work and fail. To fix this, literally just press the soldering iron against the pad and joint and apply more solder if needed. It should naturally and easily fuse properly.
- Solder Bridge: This is when the solder flows between two pads and creates a connection where there shouldn't be one. This is usually caused by using too much solder or not being careful when applying the solder. Behaviour that arises from this is unpredictable but easily noticeable. You can usually fix this by just heating up the joint again and scraping away the extra solder with the tip of the iron. If this still isn't enough, try using a solder pump to remove some excess solder.
- Overheating: This is when you leave the iron on the pad for too long and end up damaging the pad or the component. This is usually caused by not being quick enough when soldering. To fix this, you can usually just remove the component and try again with a new component if the old one is damaged. Unfortunately if the pad is damaged or completely melted you will likely have to replace the entire board.
- Overall Weak Connection: This occurs when it seems as though the joint is properly connected and should be functioning as normal but isn't. This is usually caused when you don't apply enough solder but allow some of it to flow onto the pad. This creates a false positive where it seems like the pad is entirely soldered, when in reality it may only be 50-90% soldered. You can easily fix this by applying more solder onto the joint.
Tips
Having soldered hundreds of boards and thousands of components I have learned a few fun tips that can hopefully make your time soldering much easier.
- Bend Leads: Before soldering, bend the leads of the component completely flat, parallel to the board, this will make it much easier to hold the component in place while soldering. If you're going to cut it off later, you might as well make it easier for yourself.
- Solder Groups of Components: If you have multiple similar components, place them all in the board and solder them all at once. This will save you time and make it easier as you go along.
- Use Flux: If you are having trouble with a joint, try applying some flux to the joint before soldering. This will help the solder flow and create a better connection, it's like magic.
Conclusion
Enjoy your time soldering, it's honestly a ton of fun and can be extremely useful. If you have any questions or need some more pointers you can always message me on LinkedIn.